Printers have been an issue for 11 teams around the
world and will continue to be as far as I can tell. Every new
update/release/version of an operating system has new software
intelligence to make the installation and maintenance easier, but
printer technology continues to grow and hardware vendors continue to
make changes.
The driver base for all the
different printers out there is huge, and even for the same printer,
there are numerous variations. Printers themselves have lots of options
that can be made available, and this all has to be controlled by the
operating system, through the drivers.
You will find in most
organizations that there is not a print device attached to every
computer. They are usually shared between users. This is cost effective
on many levels, but it tends to cause issues. Most of us, end users and
the IT team, need to print something once in a while, and so we send our
documents or web pages to the print device to be printed.
The print device may be
connected to someone's machine and shared for others to use, or it may
be a stand-alone device. You may have a server on your network that has
one or more print devices attached, and everyone sends their documents
to a central location. Each user machine will have a printer installed
and the appropriate drivers to allow Windows 7 to send the document to
the print device through the printer with the appropriate instructions.
Of course, the print device
can't physically print a document at the speed at which the printer can
send the data to it. This is where a software component called the spool
(spooler, print spool, etc.) comes in. There need to be software
components that can buffer the print job until the print device can
complete it. In fact, there may be more than one user sending documents
to be printed to the same print device at the same time (I'm sure this
happens), and yes, the spool handles this as well.
1. Installing Printers
Installing printers
to a machine is done in two distinct ways—one where the print device is
physically connected to the machine, one where it is not (it's
connected over the network). There have to be software drivers in either
case, and they can be on a CD/DVD, on a network share, or even in the
Windows distribution files. Printers in Windows 7 will be located in the
Devices And Printers window and will allow the Device Stage
configuration to accommodate a full range of functionality from this one
location.
To add a printer to a
machine locally, you will usually run the Setup program on the CD/DVD
(following the manufacturer's instructions). The manufacturer's Setup
program in a wizard format will ask the appropriate questions. You can
set up the printer through Windows 7 as well using the Add Printer
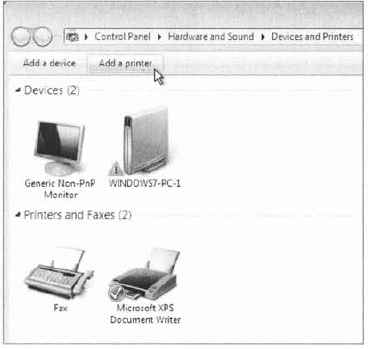
functionality of Devices And Printers. To add a printer using the
Windows 7 functionality, choose Start => Devices And Printers, and then choose Add A Printer, as shown in Figure 5.17. USB printers will be automatically detected and their drivers will be installed (or at least looked for automatically).
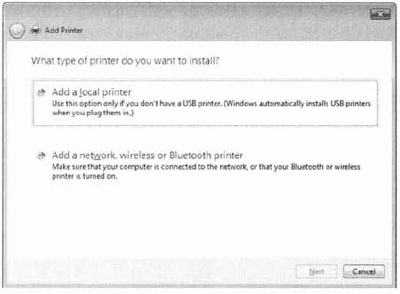
Choosing the Add Printer menu choice launches the Add Printer Wizard (starting at the screen shown in Figure 2)
and will bring up the screen where you make the choice of installing
the printer and print device locally or installing the printer locally
to access a print device remotely.
From the opening screen you can
follow the following example to install the printer for a physically
connected print device to a machine. We're going on the premise that the
setup program on the CD/DVD (if one existed) was not run and we're
installing the printer from the wizard associated with Windows.
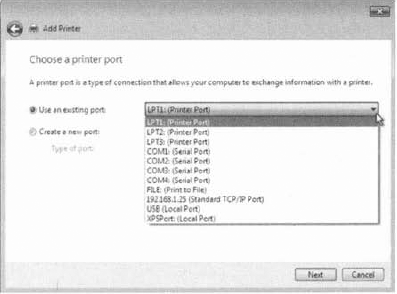
Choose Start => Devices And Printers. Select the Add A Local Printer option. In
the Add Printer window, choose the Use An Existing Port radio button
and use the drop-down window to select LPT1: (Printer Port). Then click
Next.
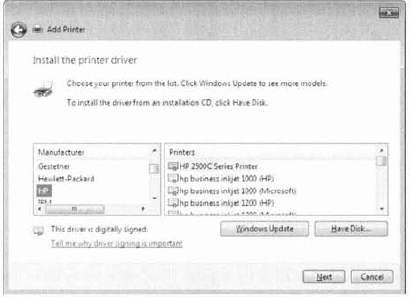
Select
the manufacturer of your print device and the printer model you want to
install. If you don't find your model in the list, it wasn't included
in the distribution files; you can click the Windows Update button to
get more choices from Microsoft. If you still don't have your model
available and you have the original disk, you can choose Have Disk and
browse to the driver files. OK, if you had the disk, wouldn't you have
just run the setup? Ah, you didn't have the disk, you went on to the
internet and downloaded the drivers . . . use the Have Disk option to
browse to the folder with the .inf file for the printer drivers.
If there was a driver previously installed, you will be given the option to use the existing driver or replace it.

After
choosing the appropriate device driver or using the existing driver and
clicking Next, you will choose the name of the printer. An intuitive
name is always a good choice here. Enter the name and click Next. You
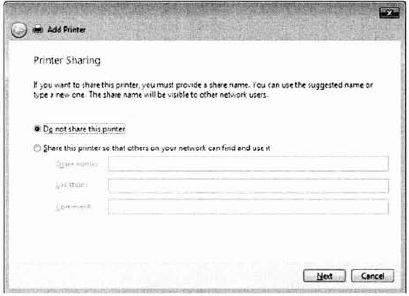
can make the print device available on the network by sharing it. The
next page of the Add Printer Wizard gives you the opportunity to do so.
For most of the options within the wizard, you can change the values or
function from the Properties dialog box (if, for example, you change
your mind later). After making your choice, click Next.
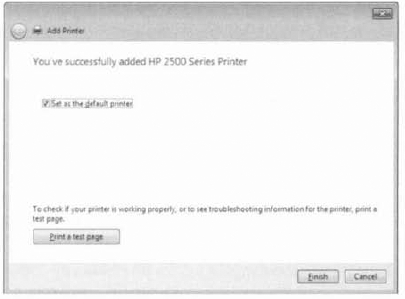
On
the final page of the Add Printer Wizard, select the Set As The Default
Printer check box (to make this the default printer for any application
on the machine) and click Print A Test Page. Once the test page prints,
click Finish. The printer for the locally connected print device is
installed on the local machine.
|
NOTE
Do not remove the printer you installed in Exercise 1. You will use it in a later exercise.
Once you have completed the Add
Printer Wizard or let the hardware vendor's setup program install your
printer, you can open the Devices And Printers window and see it. Using
the context menu, you will have access to the Properties dialog box as
well as some of the standard printing functions we've had in Windows
past. As hardware vendors start implementing functionality for Windows
7, you will have access to a full array of software components from the
Devices And Printers window, at least for the vendors who are going to
participate in the Device Stage specification.
What about installing a
printer on a machine that needs to access a print device connected to
another machine? That's fine; that is the functionality we want. You
will launch the Add Printer Wizard and go through the process of
installing the printer but point to a share or stand-alone network
printer.
Knowing that not all
machines on any company's network are going to have print devices
physically attached, there is functionality to allow sharing of
networked devices and to install printers (software) on client machines.
In Exercise 2, we will look at how to connect to a network printer.
Choose Start => Devices And Printers. Choose the Add Printers menu item. Select Add A Network, Wireless Or Bluetooth Printer. The Add Printers Wizard will search the locally available network for print devices that are available. Select
the networked print device from the Select A Printer section. If the
device is not listed, you can choose The Printer That I Want Is Not
Listed and enter the parameters for the networked print device. The
print device will be detected, the driver will be discovered and
installed, and you will be able to use the printer. It will be available
at this time in Devices And Printers.
|
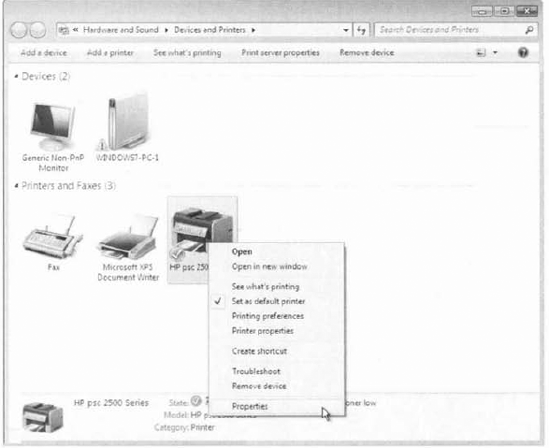
Once the printer is
installed for either a print device physically connected to the local
machine or a network-connected printer, you can view the configuration
parameters and modify them if necessary from the Properties dialog box.
Access the property pages from Devices And Printers. Right-click the
printer (Figure 3) and select Properties for the hardware properties and Printer Properties for the software components.
The Properties dialog
boxes tor printers follow a standard that Microsoft has in place, but
the content is really up to the manufacturer. Some vendors will supply
more information than others. Most printers will provide a basic set of
pages (tabs):
General Tab
The printer name, location, and comment are displayed here. The model
is typically shown as well as the features of the specific print device
and available paper. The printer preferences page is available by
clicking the Preferences button, and you can print a test page by
clicking the Print Test Page button.
Sharing Tab
The Sharing tab allows you to share a printer if it wasn't shared
during its installation or to stop sharing it if it was previously
shared. You can also add drivers for other flavors of operating systems
so the locally installed and shared printer can supply drivers for other
machines attempting to connect and use it.
Ports Tab
Available ports and print devices connected to them can be viewed on
the Ports tab. You can add a port, delete a port, and configure ports
from the tab as well. Bidirectional support for print devices supporting
this functionality (sending codes back from the print device to the
printer for control). Printer pooling is also available here. Printer
pooling gives the IT staff the ability to configure multiple print
devices (using identical drivers) to appear as one printer to connected
users. The print jobs will be printed on one of the devices in the pool
(first available print device prints the job). If a print device fails,
the others will keep working, making life better for the users (always a
goal).
Security Tab Group or user access permissions are controlled in the Security tab. Advanced permissions can be controlled here as well.
Advanced Tab
The Advanced tab provides various configuration parameters to control
the printer and print device functions. When the printer is available by
time is a configuration parameter on the advanced tab. Installed
drivers for the print device is a button option as well as adding a new
driver (by launching an Add Printer Driver Wizard). Spool options
include whether to spool or nor, and whether to start printing
immediately upon job submission, or start printing after the last page
is spooled. The Advanced tab includes the following buttons:
Printing Defaults Button Launches the printer properties for the vendor as they apply to the documents.
Print Processor Button
Lets you choose whether to use the vendor-supplied print processor or
the built-in Windows print processor. You can also choose the default
data type to be sent to the print device.
Separator Page Button Allows a specific page to be inserted between print jobs, making the separation of different documents easier.
Device Settings
Specific parameters for each print device are set up on the Device
Settings tab. Items like Form To Tray Assignment, Font Substitution, and
other installable options for the print device are configurable here.
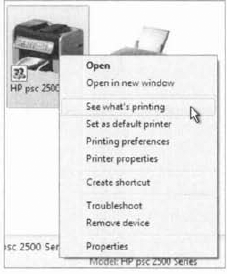
Once the configuration is
complete and the printer and print device are working in harmony, life
is good. You can see the status of the document currently being printed
as well as documents waiting to be printed. This is what we call the
queue. The queue used to be viewed by choosing the queue option in the
context menu for the printer. Windows 7 calls it See What's Printing (Figure 4).
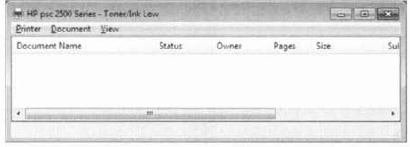
Selecting See What's Printing
opens the window that shows you what's going on with your printer (as
far as document/job control). Figure 5 shows the queue available in Windows 7.
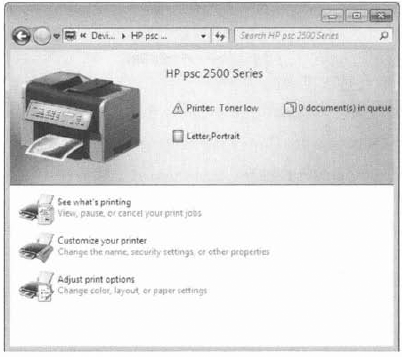
To take a look at the
better functionality of Device Stage, you can select the context window
from Devices And Printers. To get a graphical view of Device Stage,
double-click the printer in Devices And Printers to get a consolidated
view and the popular (as decided by the vendor) menu choices. Figure 6 shows a printer and its options as seen when you double-click it in Devices And Printers.
You've installed printers in previous exercises for both a locally connected and a network-connected printer. In Exercise 3,
let's take a look at sending a print job to the locally connected
printer that you set up in a previous exercise and view the document
properties.
Choose Start => Devices And Printers. Double-click
the printer previously installed as the locally connected printer. If
you haven't installed the printer yet, you can return to and complete Exercise 1. To
pause printing, open the printer window; double-click the See What's
Printing area in the body of the window or single-click the Printer item
in the top of the window. Choose Printer => Pause Printing from the menu. View
the status bar of the printer to verify that the printer is paused;
there will also be a check mark next to Pause Printing in the menu.
Now, let's send a test document to the paused locally connected printer:
From the Printer window, select Printer => Properties. On the General tab of the Properties window, click the Print Test Page button. An information box will appear stating a test page has been sent to the printer; click the Close button. Click the OK button in the printer Properties window. The Printer window will display the print job in the queue.
You can view document properties from a job in the print queue.
In the Printer window, single-click the document you want to view (the print job you want to view). Choose Document =>
Properties to view the document properties; you can also right-click
the print job and select Properties from the context menu. The General
tab will show you the document properties, the other tabs are vendor
supplied to control additional printer functionality for the document. Choose
OK or Cancel to close the Properties window. OK will save any changes
made and close the window. Cancel will close the window without saving
any changes. If you have made any configuration changes, the Apply
button will become available; selecting Apply saves any changes made but
does not close the window.
Now, delete a document from the queue.
In the Printer windows, single click the job you want to cancel [the document you want to delete). Choose Document =>
Cancel From The Printer Window Menu Structure to delete the document.
You can also right-click the document and select Cancel to delete the
print job. Either method will prompt a confirmation message box asking
Are You Sure You Want To Cancel The Document? Choose Yes. The document will no longer be in the queue in the Printer window. Choose Printer => Close to close the Printer window.
|
There may also be times you
will want to delete a printer, either one that's locally connected or a
network printer, from your Windows 7 machine. This will be done from the
Devices And Printers window. Removing a printer will remove the
software configuration but not necessarily the files (drivers and
software) from the local machine.